Required permissions for setup
The user setting up this data source must be the Global Admin.Register a new app
- Sign into the Azure portal. Select Microsoft Entra ID, then Manage > App registrations > New registration.
-
On the Register an application page, register an app with the following:
Field Value Name Glean for Outlook Domain-DelegatedSupported account types Accounts in this organizational directory only (Single tenant) Redirect URI (Leave this field blank) - Click Register.
Configure permissions
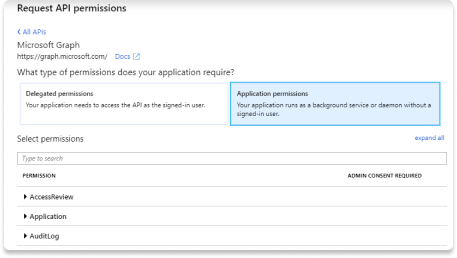
- In the left sidebar of the app overview page, click on API Permissions under Manage.
-
Under Add a permission > Microsoft Graph > Application permissions, add the following permissions:
Mail.ReadCalendars.Read
-
To allow Glean to index Outlook emails, add the following permissions:
GroupMember.Read.AllUser.Read.All
Grant admin consent
- Ensure you are signed into Azure as a Global, Application or Cloud Application Administrator.
- Use the search box to navigate to Enterprise applications. Select the Glean app you just created from the list of applications.
- Click on Permissions under Security. Review the permissions shown, and then click Grant admin consent.

Install openssl
Openssl is installed by default on OS X terminals. If you are using Windows, follow these instructions to download openssl for use with PowerShell.- Download the relevant openssl installation manager for your version of Windows. Openssl offers a list of third-party binary distributions, with Shining Light Productions as an option.
- During the installation process, select the option to copy the OpenSSL binaries into the /bin directory.
-
Open a new PowerShell instance. In PowerShell, you can run the following command to make use of openssl binaries.
$env:Path += ";C:\\Program Files\\OpenSSL-Win64\\bin"
Generate Certificate and Private Key
-
Run the following command line by line. Microsoft SDK requires the certificate to be verified with a private key in PKCS#8 syntax.
openssl genrsa -out tempprivatekey.key 2048openssl pkcs8 -topk8 -inform PEM -outform PEM -in tempprivatekey.key -out privatekey.key -nocryptopenssl req -new -key privatekey.key -out request.csropenssl x509 -req -days 365 -in request.csr -signkey privatekey.key -out certificate.crt
-
Verify that both
certificate.crtandprivatekey.keyexist. Open each file, and ensure the files conform to the following formats:- The certificate file should start with
-----BEGIN CERTIFICATE-----and end with-----END CERTIFICATE----- - The private key should begin with
-----BEGIN PRIVATE KEY-----and end with-----END PRIVATE KEY-----. It should not includeRSAin the headers, nor be encrypted.
- The certificate file should start with
-
Upload the
certificate.crtin Glean under Client Certificate. -
Upload the
privateKey.keyin Glean under Private Key.
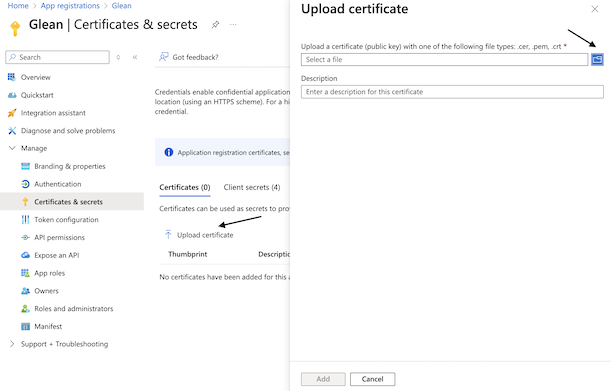
Upload Certificate to Azure
- Navigate back to Microsoft Entra ID > Manage > App registrations and click on the app you created earlier. Then click on Manage > Certificates & secrets in the left sidebar.
- Click the Certificates Section and Upload certificate.
- Upload the
certificate.crtfile that you just generated. After uploading, the application should now list the new certificate.
Upload keys
- Scroll to the top of the left sidebar and click Overview.
-
Copy the following content from the center Essentials panel and enter it in Glean:
- Application (client) ID
- Directory (tenant) ID
Additional Steps
- Fill out the email used for setting up the application, which will only be used to validate the setup. By default, this email may end with onmicrosoft.com, as Microsoft generates a default domain of onmicrosoft.com. Any user email with Outlook enabled will work to validate the configuration.
Manage users (optional)
- To limit who can connect to Outlook, use the search box to navigate to Enterprise Applications.
- Select the Glean for Outlook Domain-Delegated app you just created, then in the left navigation click on Properties under Manage.
- Toggle User assignment required? to Yes.
- Go to Users and groups in the left navigation and add whichever users and groups you’d like to access Outlook.
